User authentication
This is an Enterprise feature.
To integrate user authentication in ChartFactor Studio, the first step is to setup the config/auth.json file found inside your ChartFactor Studio deployment folder. This file is empty on new deployments. An example configuration to enable authentication is shown below. An example is also found in the config/auth_example.json file.
1 2 3 4 5 6 7 8 9 10 | |
Note
After modifying the config/auth.json you need to unregister the Studio's service worker sw.js for the change to take place.
Structure of the auth.json file
-
authetication: this object contains the authentication configuration.
- type: the type of the authentication. Only the value
endpointis supported. - loginPage: the URL of the login page that ChartFactor Studio will use when users need to authenticate. A default login page is included at
config/login.html. You can update this page or provide your own. - headers: the template to generate headers when interacting with secured data providers. Note that no security token is included here yet. We'll cover that in the Login page section.
- type: the type of the authentication. Only the value
-
dataProviders: this is an array of data provider objects to pre-create for end users. They are created when users first open ChartFactor Studio and cannot be modified or deleted. An example entry is shown below:
1 2 3 4 5 6 7 8 9 10 11 12 13 14 15 16 17 18 19 20 21 22 23 | |
The above configuration specifies two static providers. The first one pulls data from a server that doesn't require authentication. The second one however includes the isAuth property set to true, meaning that this provider is forced to authenticate using the specified user credentials before pulling any data.
Login page
As mentioned earlier, ChartFactor Studio comes with a default login page located at config/login.html inside the Studio deployment folder. You are free to customize this login page, for example, by using any CSS framework or any CSS classes to create your own fancy login page. However, you just need to be careful with a few things:
- You need to respect the structure of the login page. Inside the file you will find a
<form id="authForm">element. You need to keep this element and the name of its id. - You have a
<p id="error">element too. This is used to display any errors when you consume the login service. You can modify the element, probably use another one, but you have to keep the same id. - When you define the input elements inside the form you have to be careful with the name. For example, if your authentication service needs an email and password to provide the access token, you need to set the same names in the input elements:
1 2 | |
-
The
extractAuthArgs(response)function needs to return the object to append to headers of secured requests. For example if your authentication service returns an object that includesuseridandaccessToken, you would need to extract this information and return the header object as shown below:1 2 3 4 5
window.extractAuthArgs = (response) => { const { user: { userId, accessToken }} = response; return { userId, Authorization: `Bearer ${accessToken}` }; } -
The
obtainAuthURL()function needs to return the URL of the authentication service -
The login page needs to import this script:
1 | |
AWS Cognito Integration
You can easily integrate ChartFactor Studio with AWS Cognito Authentication by editing the config/auth.json file and the config/redirect.html files found inside your ChartFactor Studio deployment folder.
config/auth.json
The structure of this file is explained in the Structure of the auth.json file section. To enable the AWS Cognito integration you need to specify the loginPage property. This property follows the following structure:
{Cognito Domain}/login?response_type=token&client_id={Client ID}&redirect_uri={Redirect Page}
Cognito Domain
This is the domain you configured in AWS for your Cognito user pool. Example: https://es-testdomain.auth.us-east-1.amazoncognito.com
Client ID
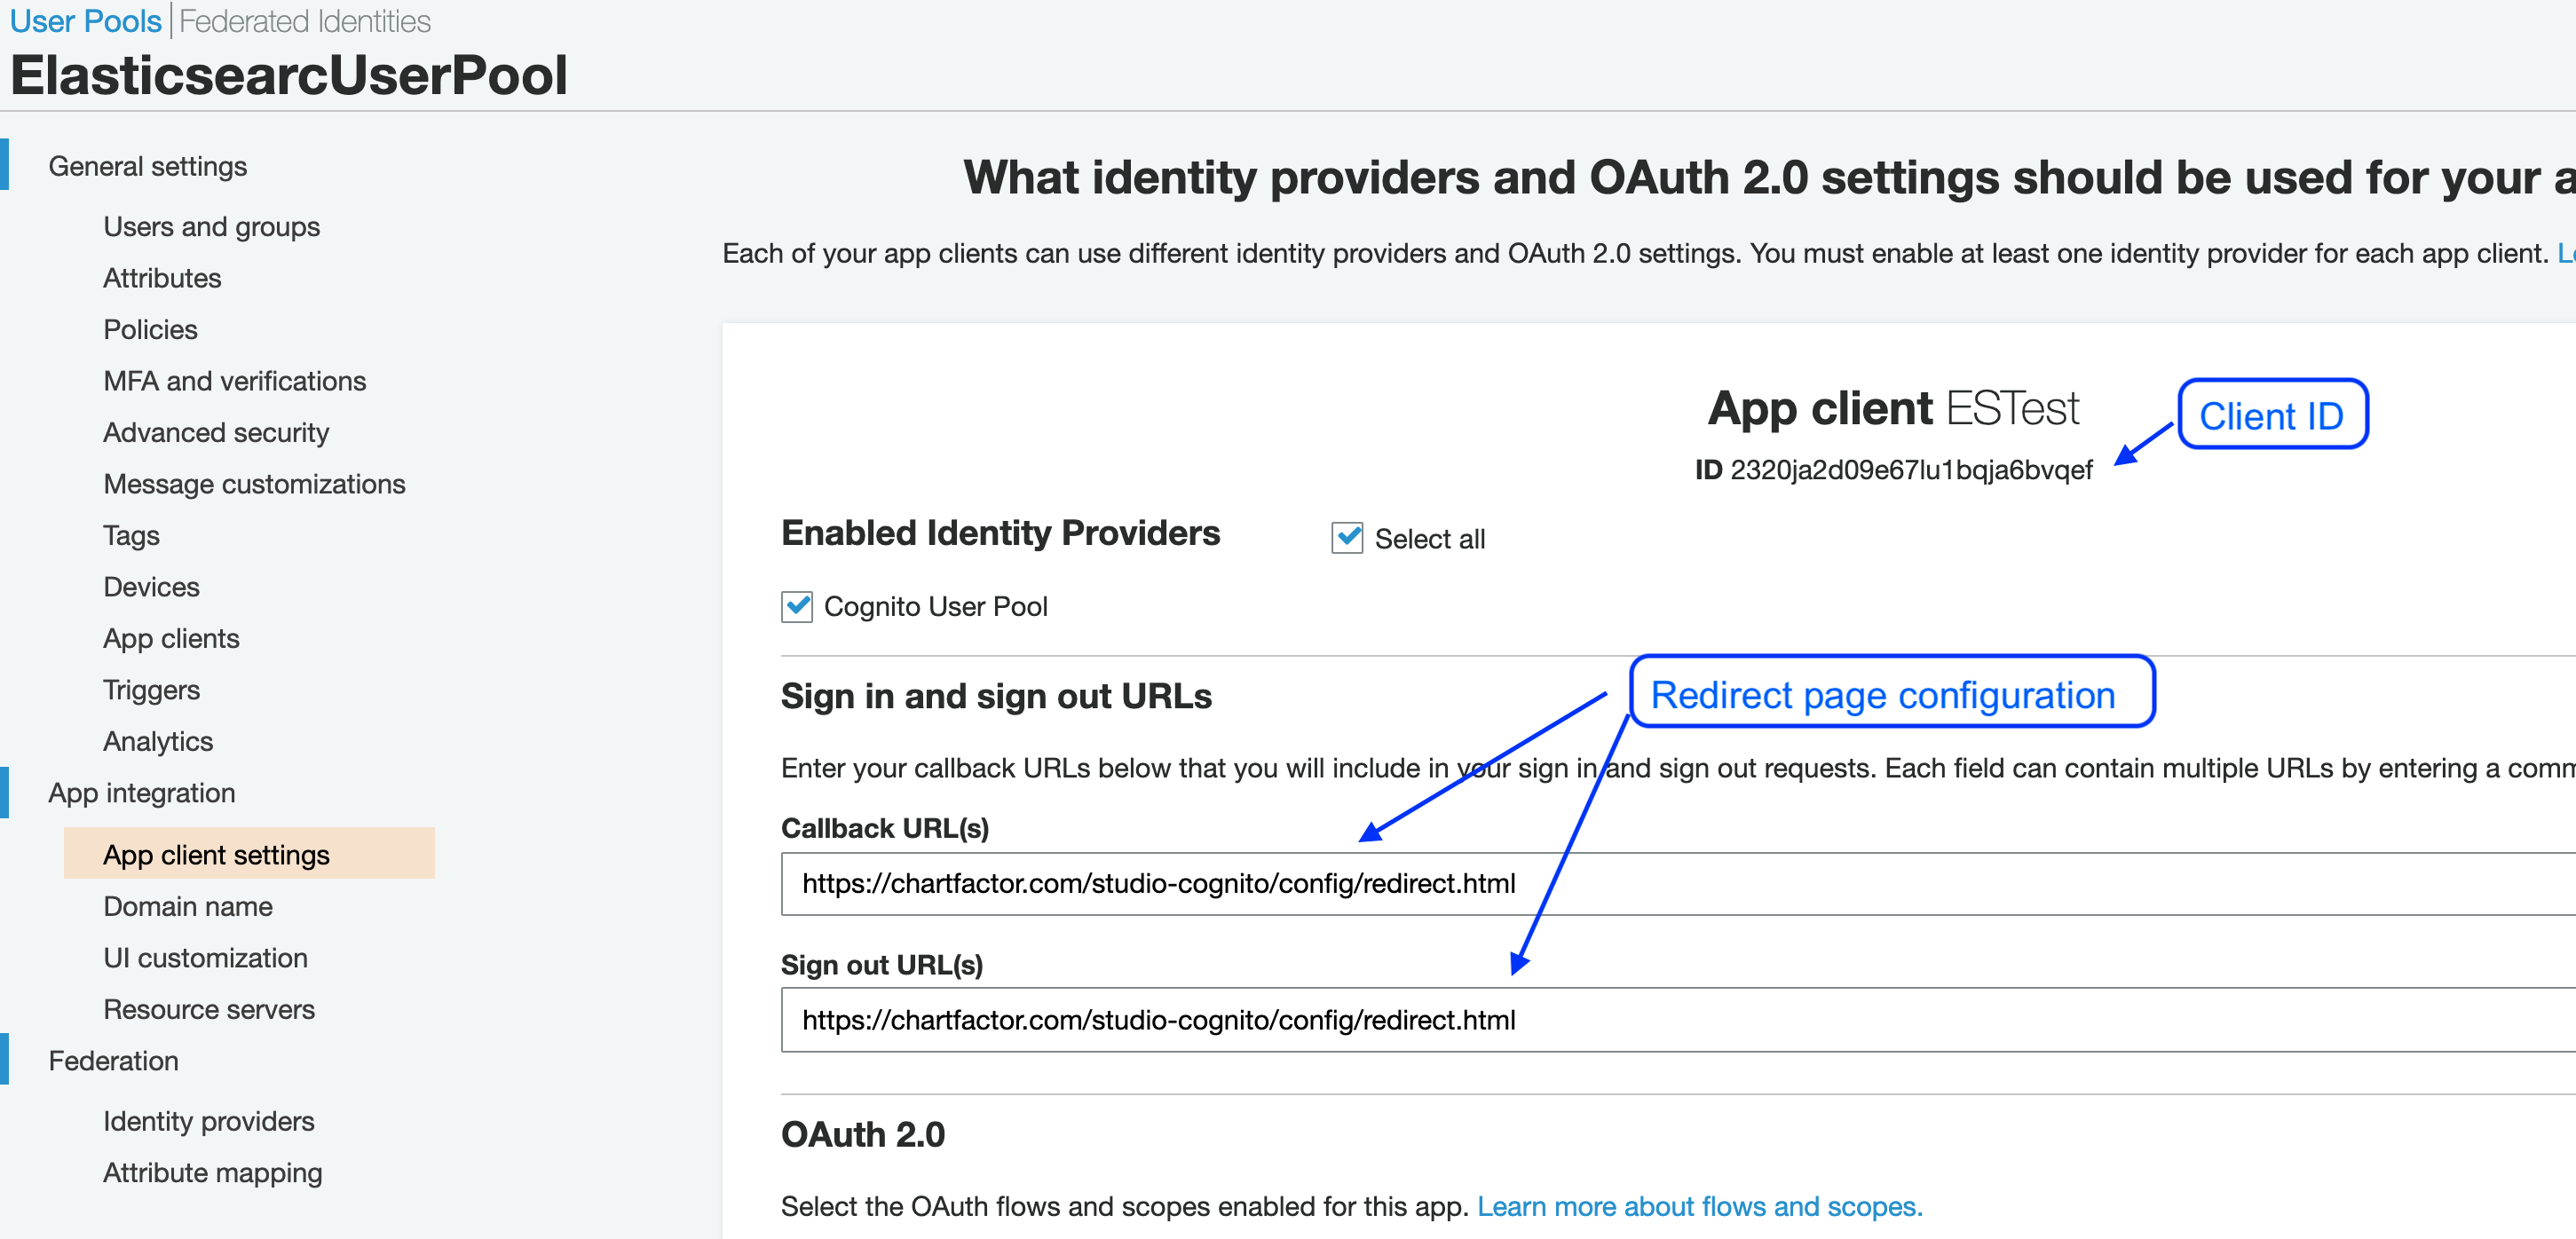
This is the client ID you configured in AWS for your application in your user pool. Example: 2320ja2d09e67lu1bqja6bvqef
Redirect Page
As a pre-requisite, you need to go to the AWS Console, in the App client settings section of your Cognito User Pool configuration, and configure the Callback URL(s) and Sign out URL(s) to point to the config/redirect.html page using the full URL of the page. Example: https://my-domain.com/my-studio/config/redirect.html. A screenshot of the AWS Cognito configuration is below:
Now, update the loginPage URL of the config/auth.json file in your ChartFactor Studio deployment to include its redirect component.
Your loginPage URL should look similar to the one below.
1 2 3 4 5 6 7 8 9 10 11 12 13 14 15 16 17 18 19 20 21 22 23 | |
config/redirect.html
The config/redirect.html page is also found inside your ChartFactor Studio deployment folder. The authentication process redirects users to this page after they are successfully logged in. This page performs the following:
- Checks that the token comes in the URL (after the user authenticates)
- Stores the token and expiration date in the
cfs.providerAuthkey in the localStorage - Takes the user to the Studio home page
You need to edit this page to specify the home location of Studio as shown below:
1 | |
This same redirection page can be used for any oauth system other than Cognito. Just make sure to build the header properly after the token is received.